Tractivvity · Feature guide · Gran Turismo 7
Racecraft
The lessons that teach how a fast lap is driven, and the page that reads every lap you have stored and tells you which of them to work on.
What Racecraft is
Every lap you store leaves a number behind. Racecraft is the part of Tractivvity that reads all of those numbers together and tells you the one thing to change on your next run.
A telemetry trace shows you what one lap did. Racecraft reads every lap you have stored, finds the habits that repeat, prices them in seconds against your own lap times, and ranks them. The output is not a chart to interpret. It is a sentence: squeeze the throttle, don't stab it — about 84 ms a lap.
There are two halves, and they work as a pair.
The lessons
Eleven lessons on how a fast lap is actually driven, each with a good-vs-bad chart and a checklist for spotting the habit in your own traces.
Your Driving
The same techniques, measured on your laps. What you do, how often, what it costs you, and which corner to fix first.
Read the lessons to learn what to look for. Read Your Driving to find out which of them is costing you time. The rest of this section walks through both, using one real account's output — 3,911 clean laps over 412 sessions.
The lessons BASIC
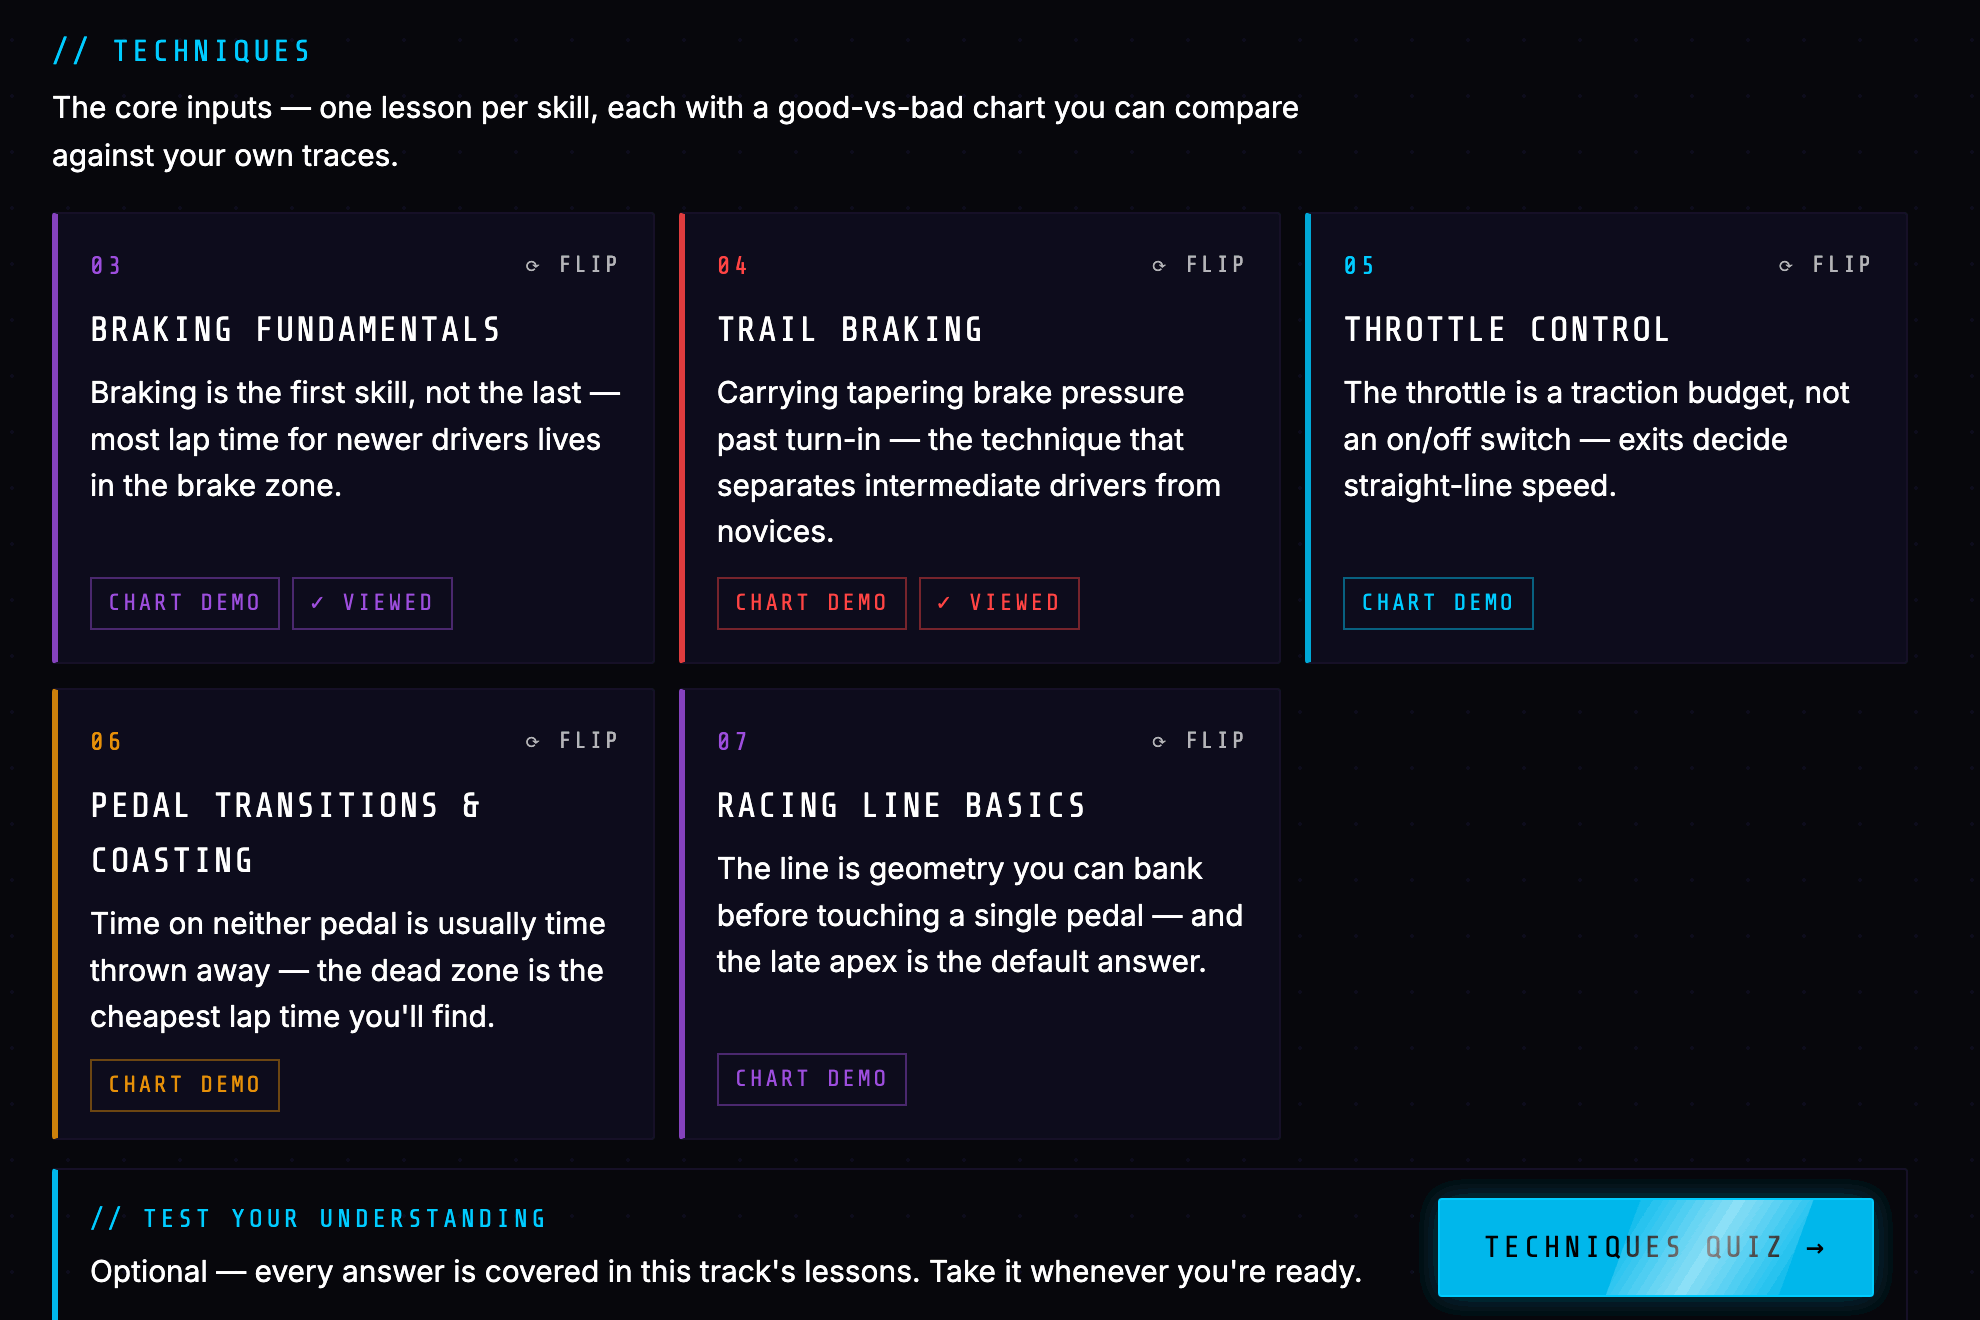
/racecraft is the front door. Eleven lessons in three tracks — Start Here, Techniques, and Driving Styles & Theory — plus a card straight through to Your Driving.
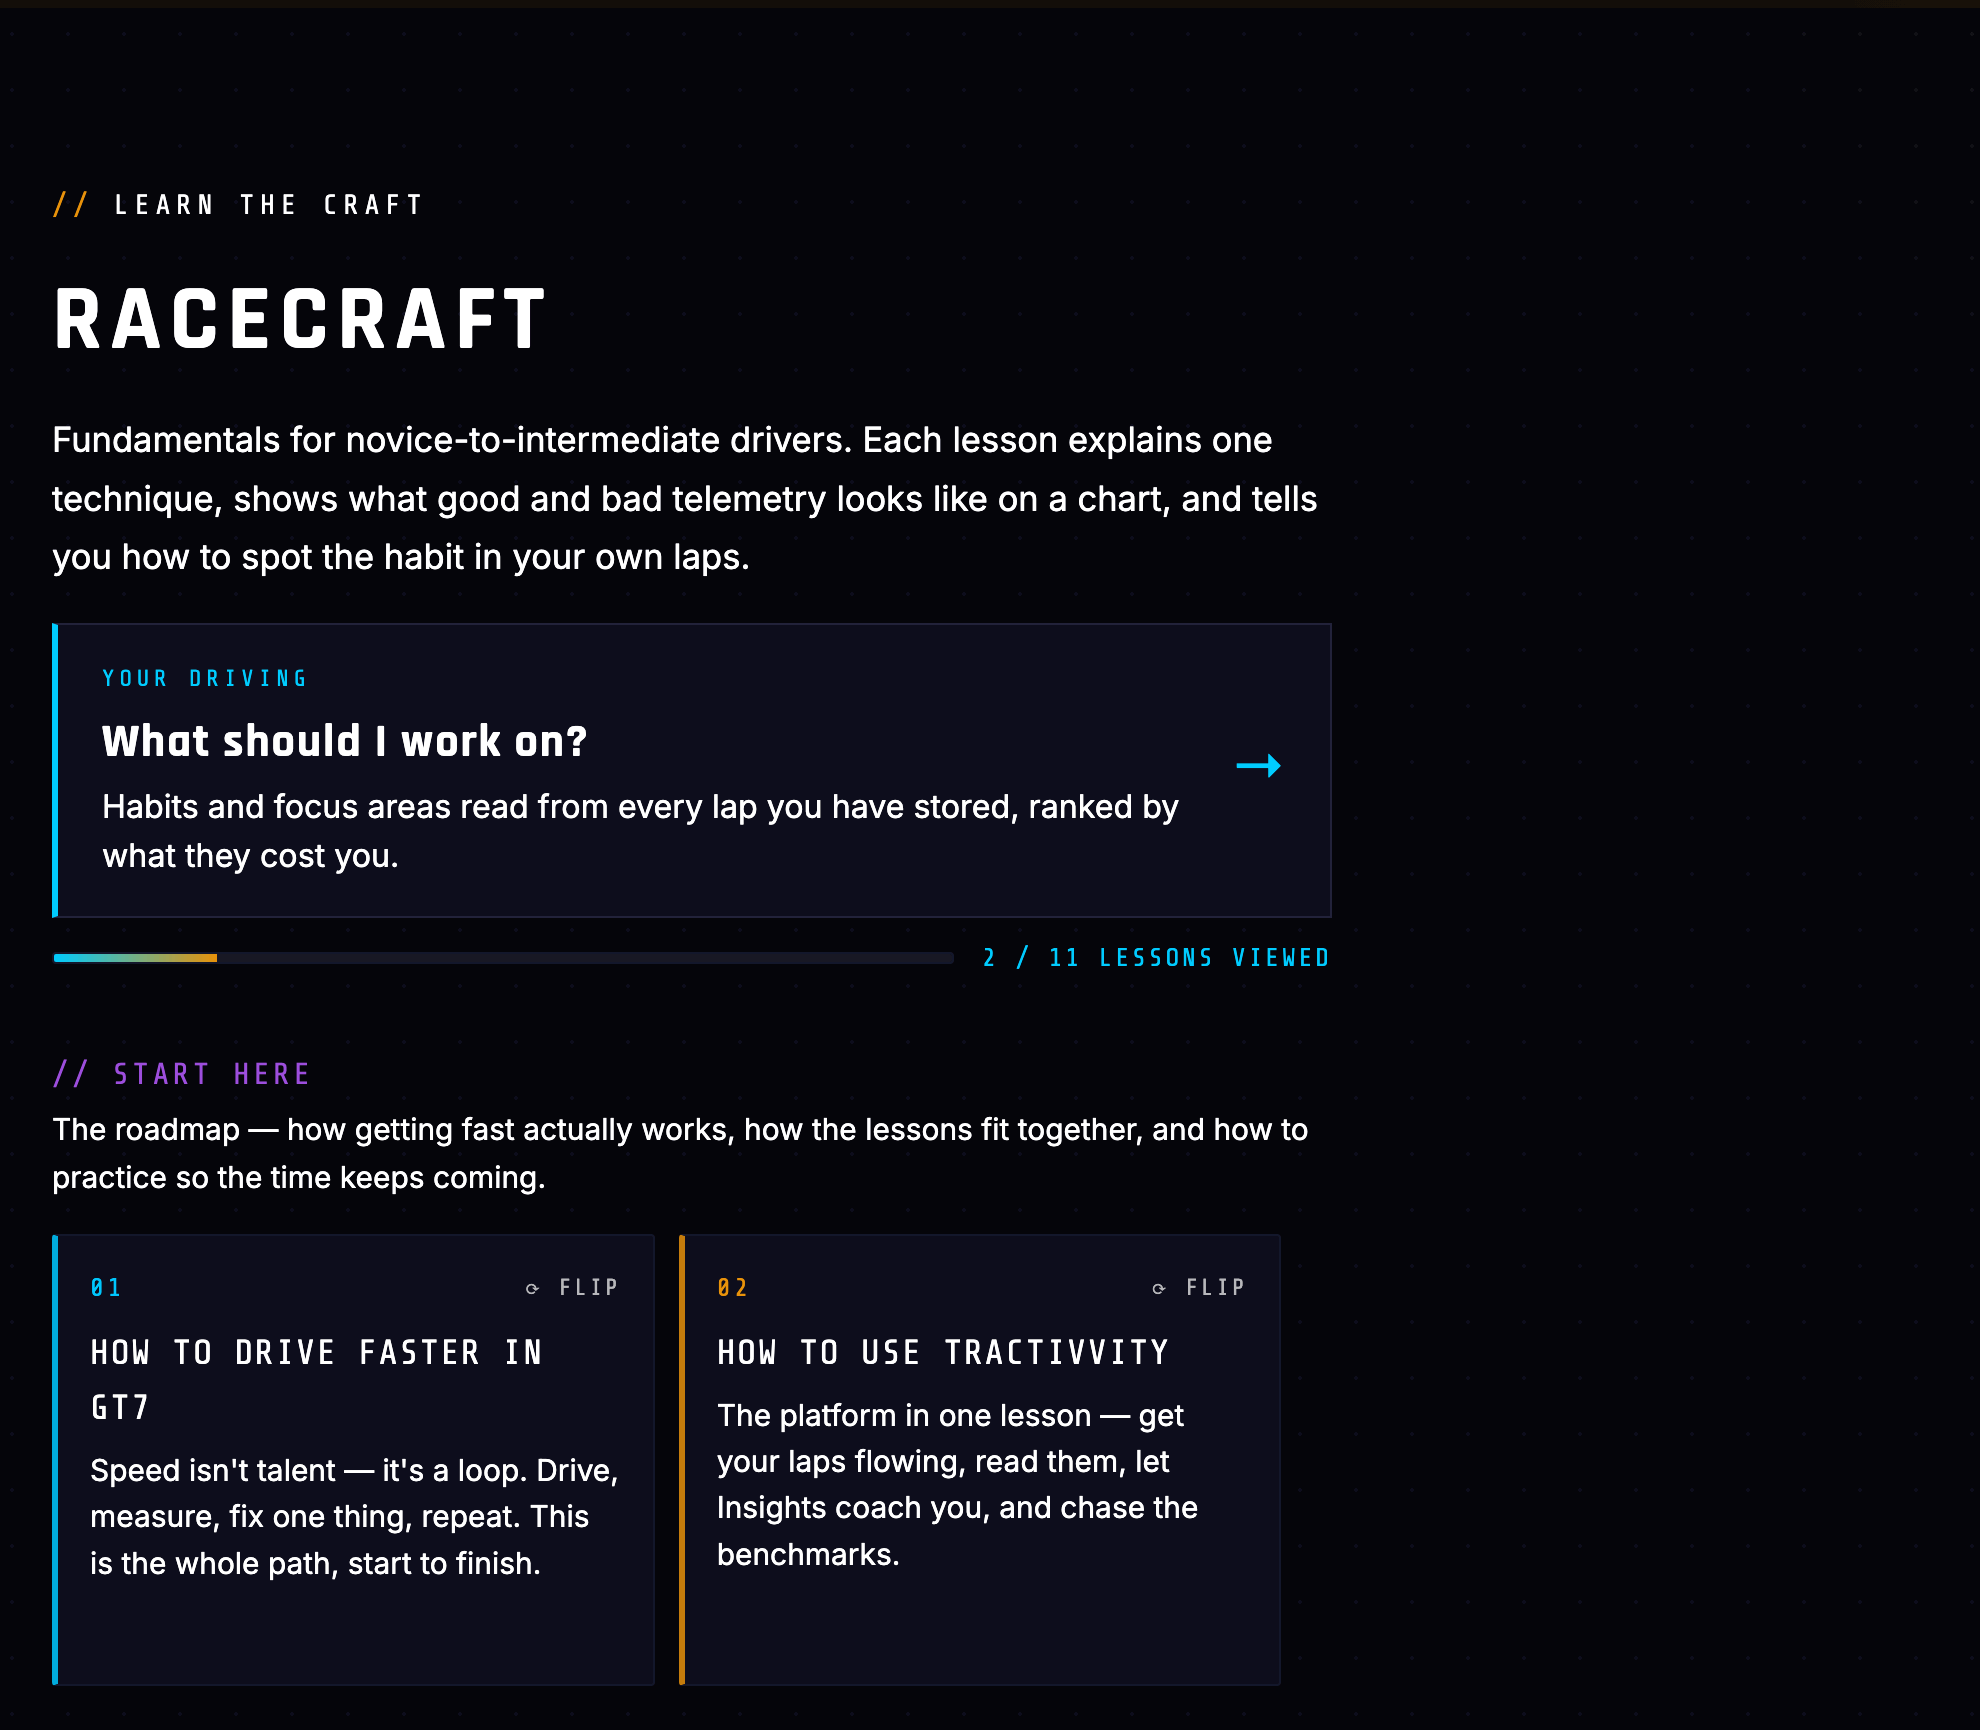
The Techniques track is the core: one lesson per skill, in the order the skills actually build on each other.
What a lesson gives you
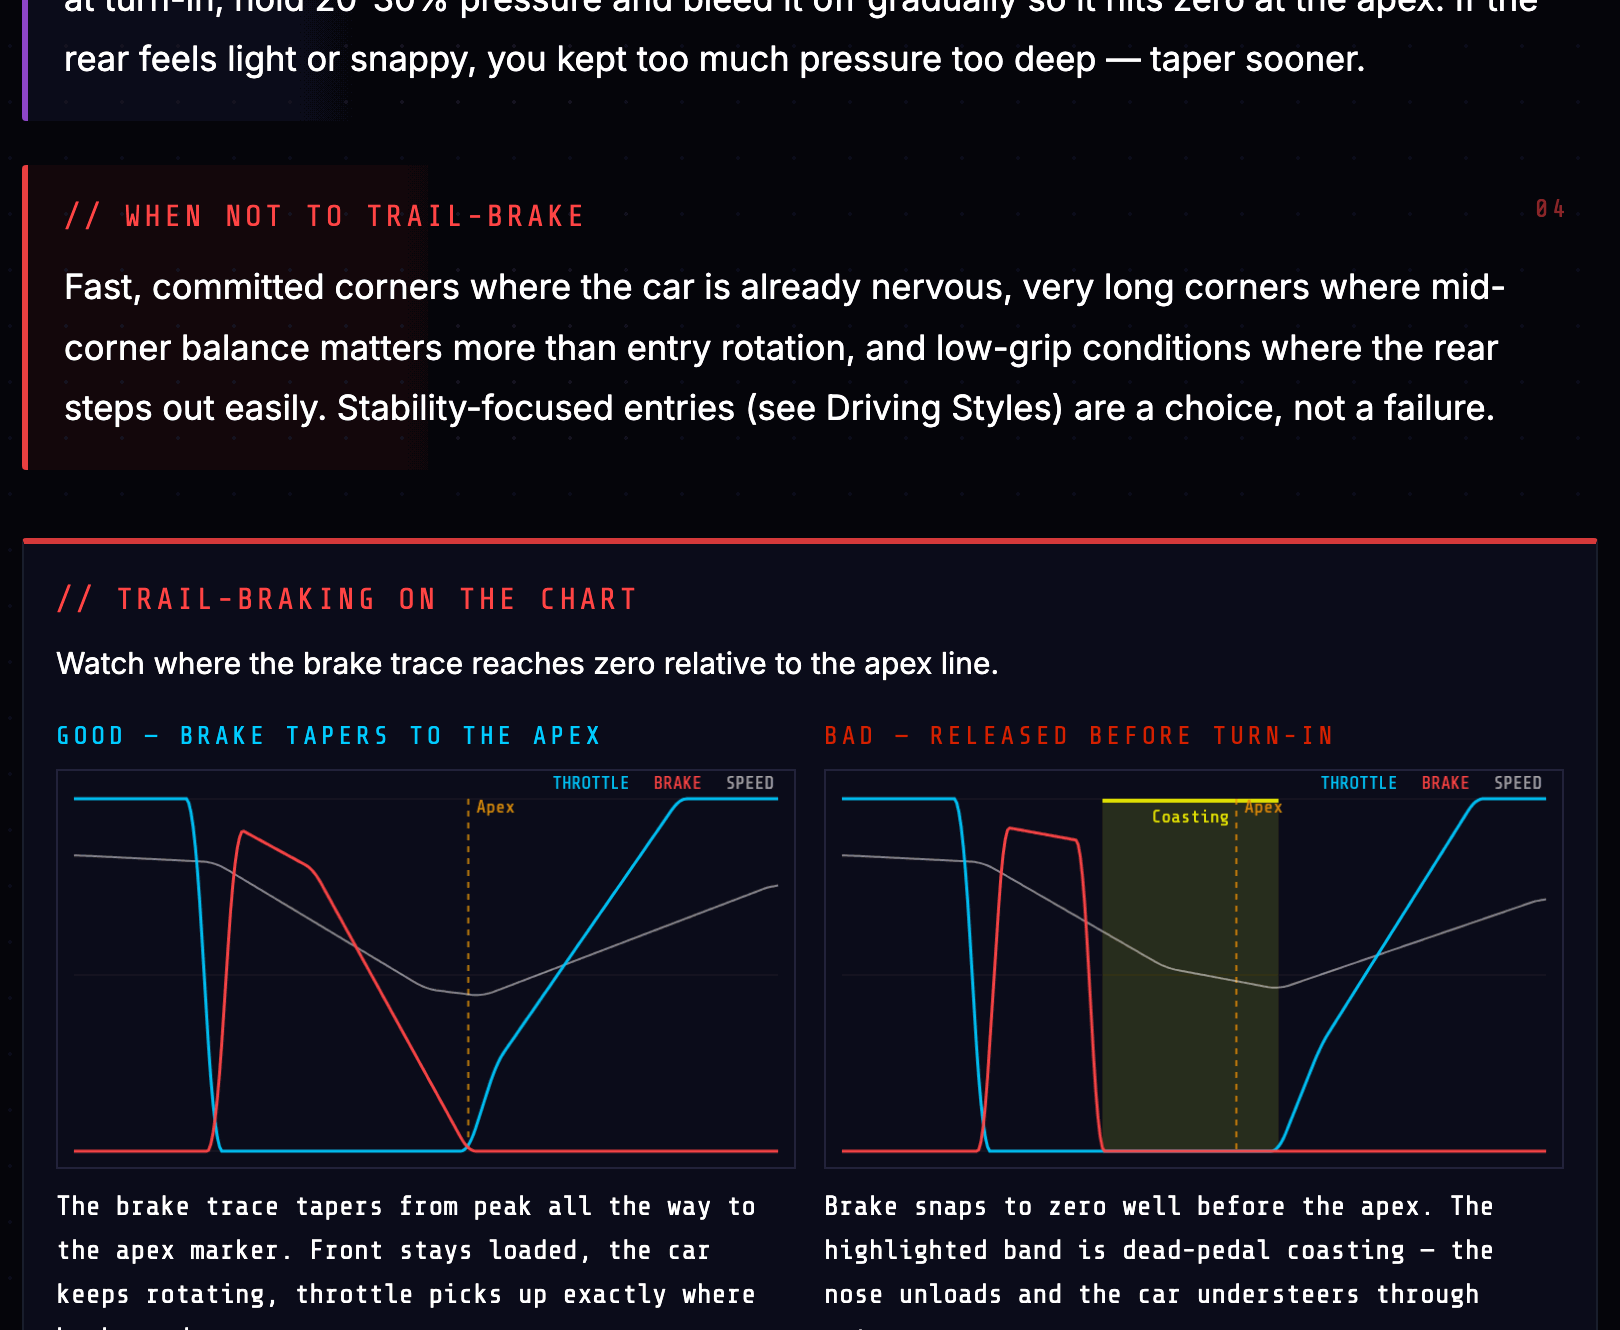
Every Techniques lesson is built the same way: what the technique is, why it is faster, how to practise it, when not to use it, and then the part that makes it Tractivvity rather than a forum post — the same technique drawn as two telemetry traces, right and wrong.
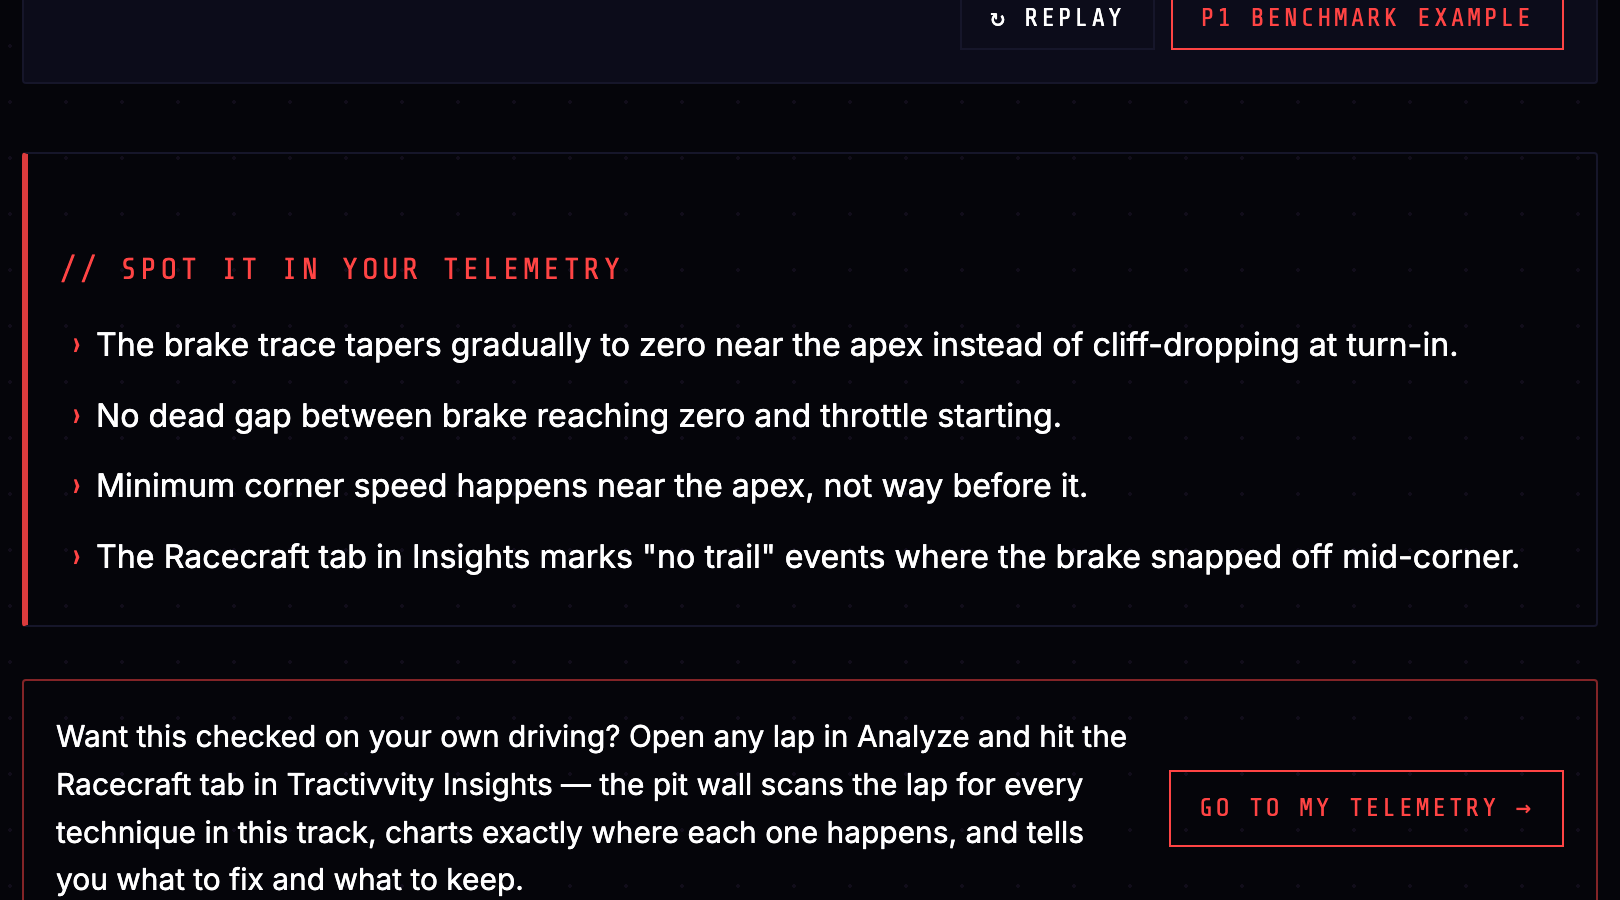
Each lesson closes by handing you back to your own data — a checklist of what the habit looks like on a trace, and a link into your telemetry.
Both the Techniques and the Theory tracks end with an optional quiz. Every answer is covered by the lessons in that track; nothing is graded and nothing is gated — it is there so you can check the ideas landed before you go looking for them in your data.
Your Driving PRO
/racecraft/driver is the other half. It reads every analysable lap you have stored and answers one question: what should I work on?
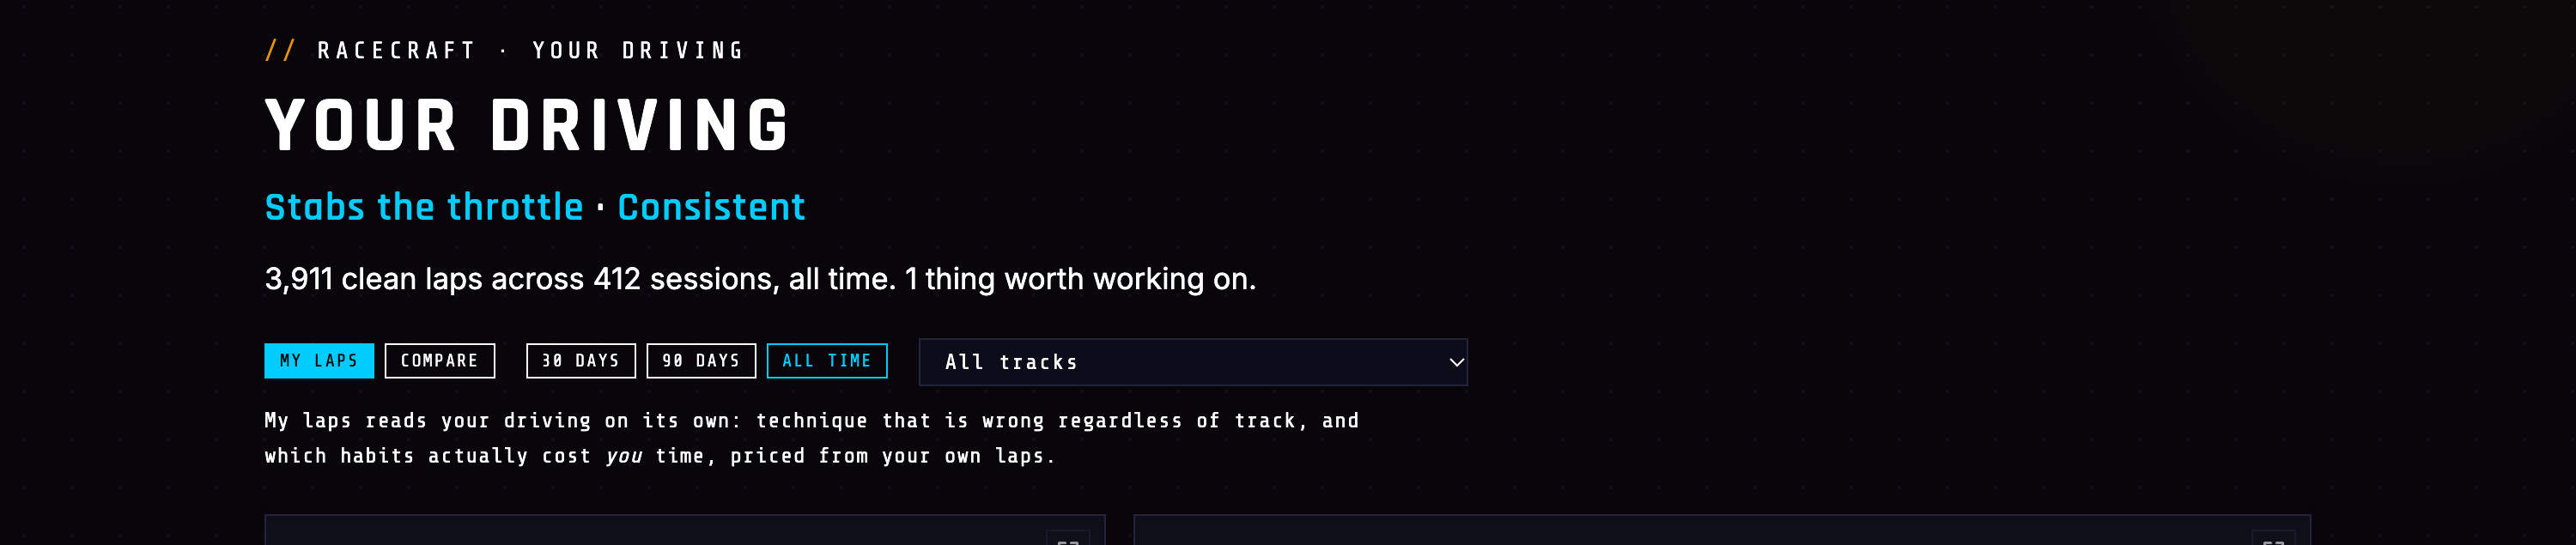
The signature
Dancing on the throttle · Consistent. Two clauses — the habit that costs the most and the thing you already do well. It is a label for how you drive, derived from the findings below it, and it is the fastest honest summary of an account that exists anywhere in Tractivvity.
The coverage line
3,911 clean laps across 412 sessions, all time. 1 thing worth working on.
“Clean” is doing work there. A lap is analysed only if it is complete, valid, not a pit lap, not a demo lap, not discarded, and carries telemetry sampled densely enough to read. Everything else is counted and set aside, and the page tells you what it set aside and why.
Your Driving never touches a raw telemetry array. Every lap is reduced once, when it lands, to a row of measurements — coasting share, throttle reversals, brake release shape, dead time between pedals, off-track share, kerb share, corner-by-corner entry and apex numbers. Racecraft reads those rows. That is why it can hold 3,911 laps in one answer instead of one lap in one chart.
The two modes, and the window
Judged on their own
Two things need nobody else: technique that is wrong by physics regardless of track, and which habits actually cost you time, priced from your own lap times.
Judged against the field
Every lap measured against the fastest quarter of other drivers' laps on the same track and car, plus any benchmark laps. Habits whose normal value depends on the track — total coasting, brake release shape — live here.
The window control (30 DAYS / 90 DAYS / ALL TIME) sets how far back to read, and the track picker narrows everything to one circuit. Every number on the page moves with those three controls.
The habit fingerprint
Nine measurements, your median per lap, each against the line that counts as acceptable.
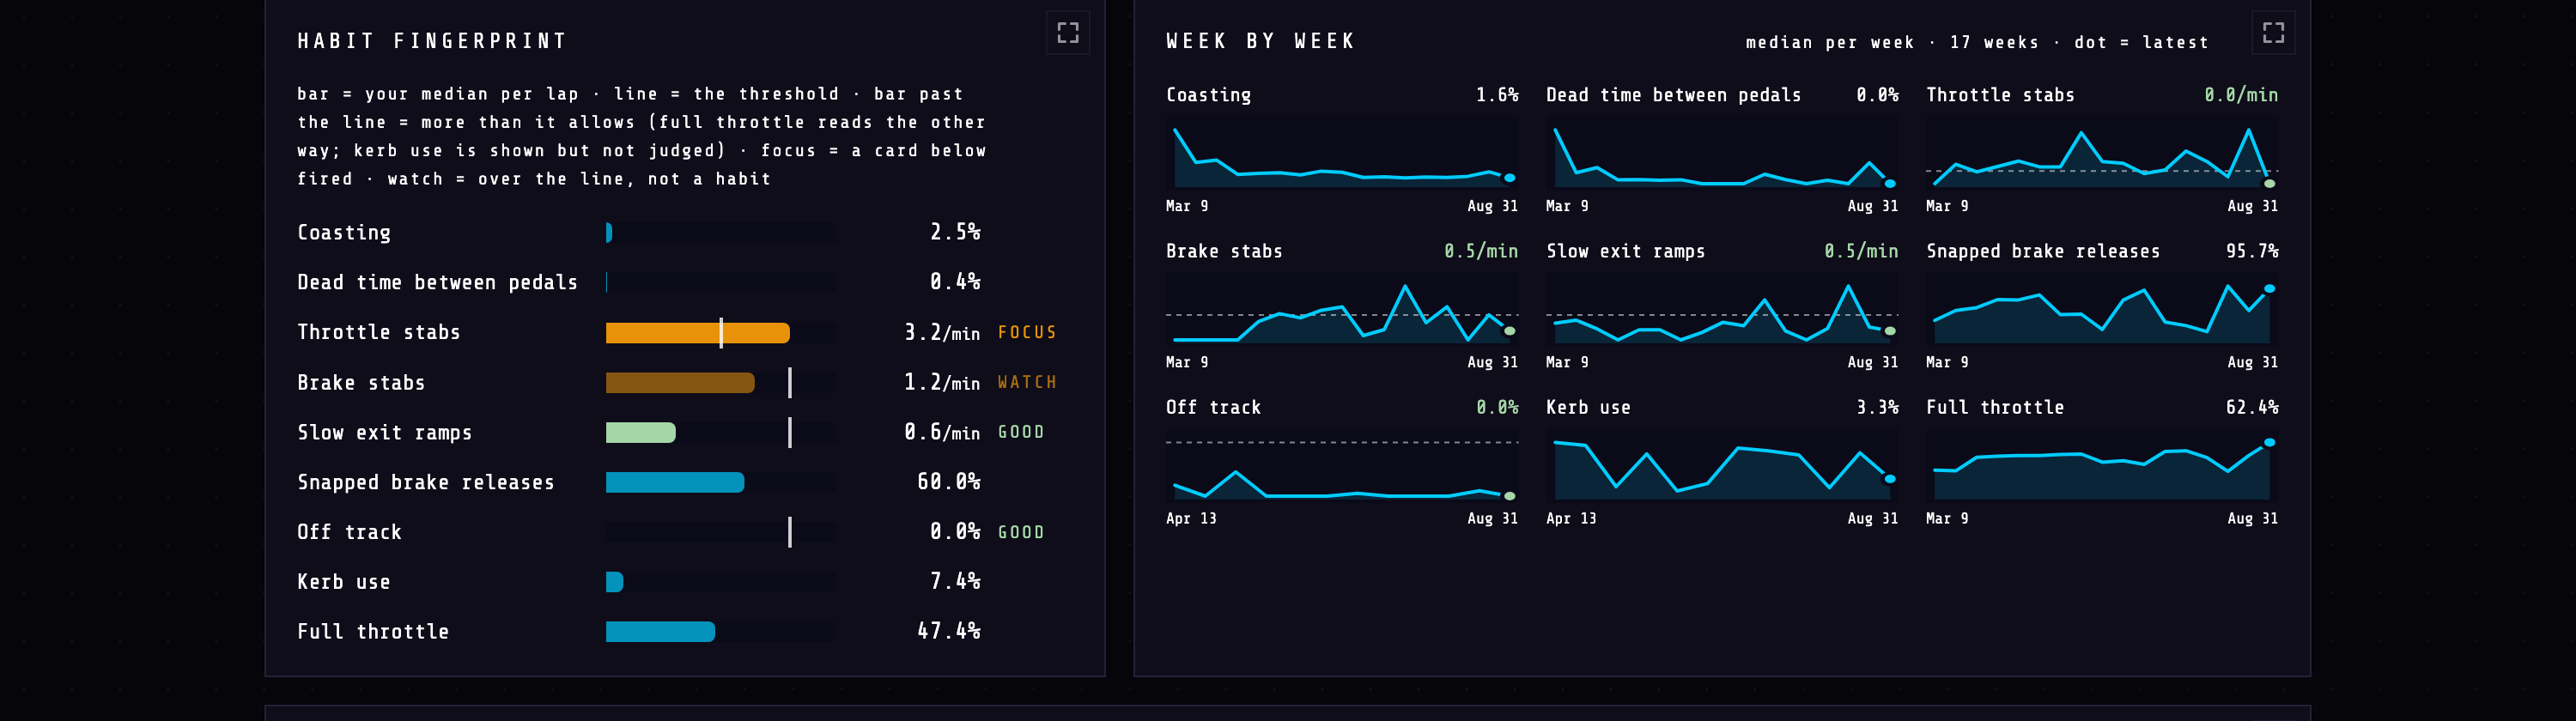
| Row | What it counts | This account |
|---|---|---|
| Coasting | Share of the lap on neither pedal | 2.5% |
| Dead time between pedals | Brake release → throttle, as a share of the lap | 0.4% |
| Throttle stabs | Throttle reversals inside a corner, per minute | 3.2/min — FOCUS |
| Brake stabs | Multi-hit brake applications, per minute | 1.2/min — WATCH |
| Slow exit ramps | Tentative throttle ramps on exit, per minute | 0.6/min — GOOD |
| Snapped brake releases | Share of brake zones released abruptly | 60.0% |
| Off track | Share of samples with a wheel off the surface | 0.0% — GOOD |
| Kerb use | Share of the lap on a kerb | 7.4% |
| Full throttle | Share of the lap at 100% | 47.4% |
Three labels, and the difference between them is the whole design:
- FOCUS — over the line and a card fired below. This one has passed every test and is priced.
- WATCH — over the line, but not enough of a pattern to call a habit yet. It is shown because you should know, not because you should act.
- GOOD — comfortably inside the line.
Two rows are deliberately unjudged. Kerb use has no correct direction — riding a kerb is often the fast line — so it is shown against the reference and never scored. Full throttle reads the other way: more is better.
The week-by-week panel on the right is the same nine numbers over time. That is where you see whether the thing you worked on last month actually moved.
Where it shows
The fingerprint is a median. The median hides which tracks are dragging it.
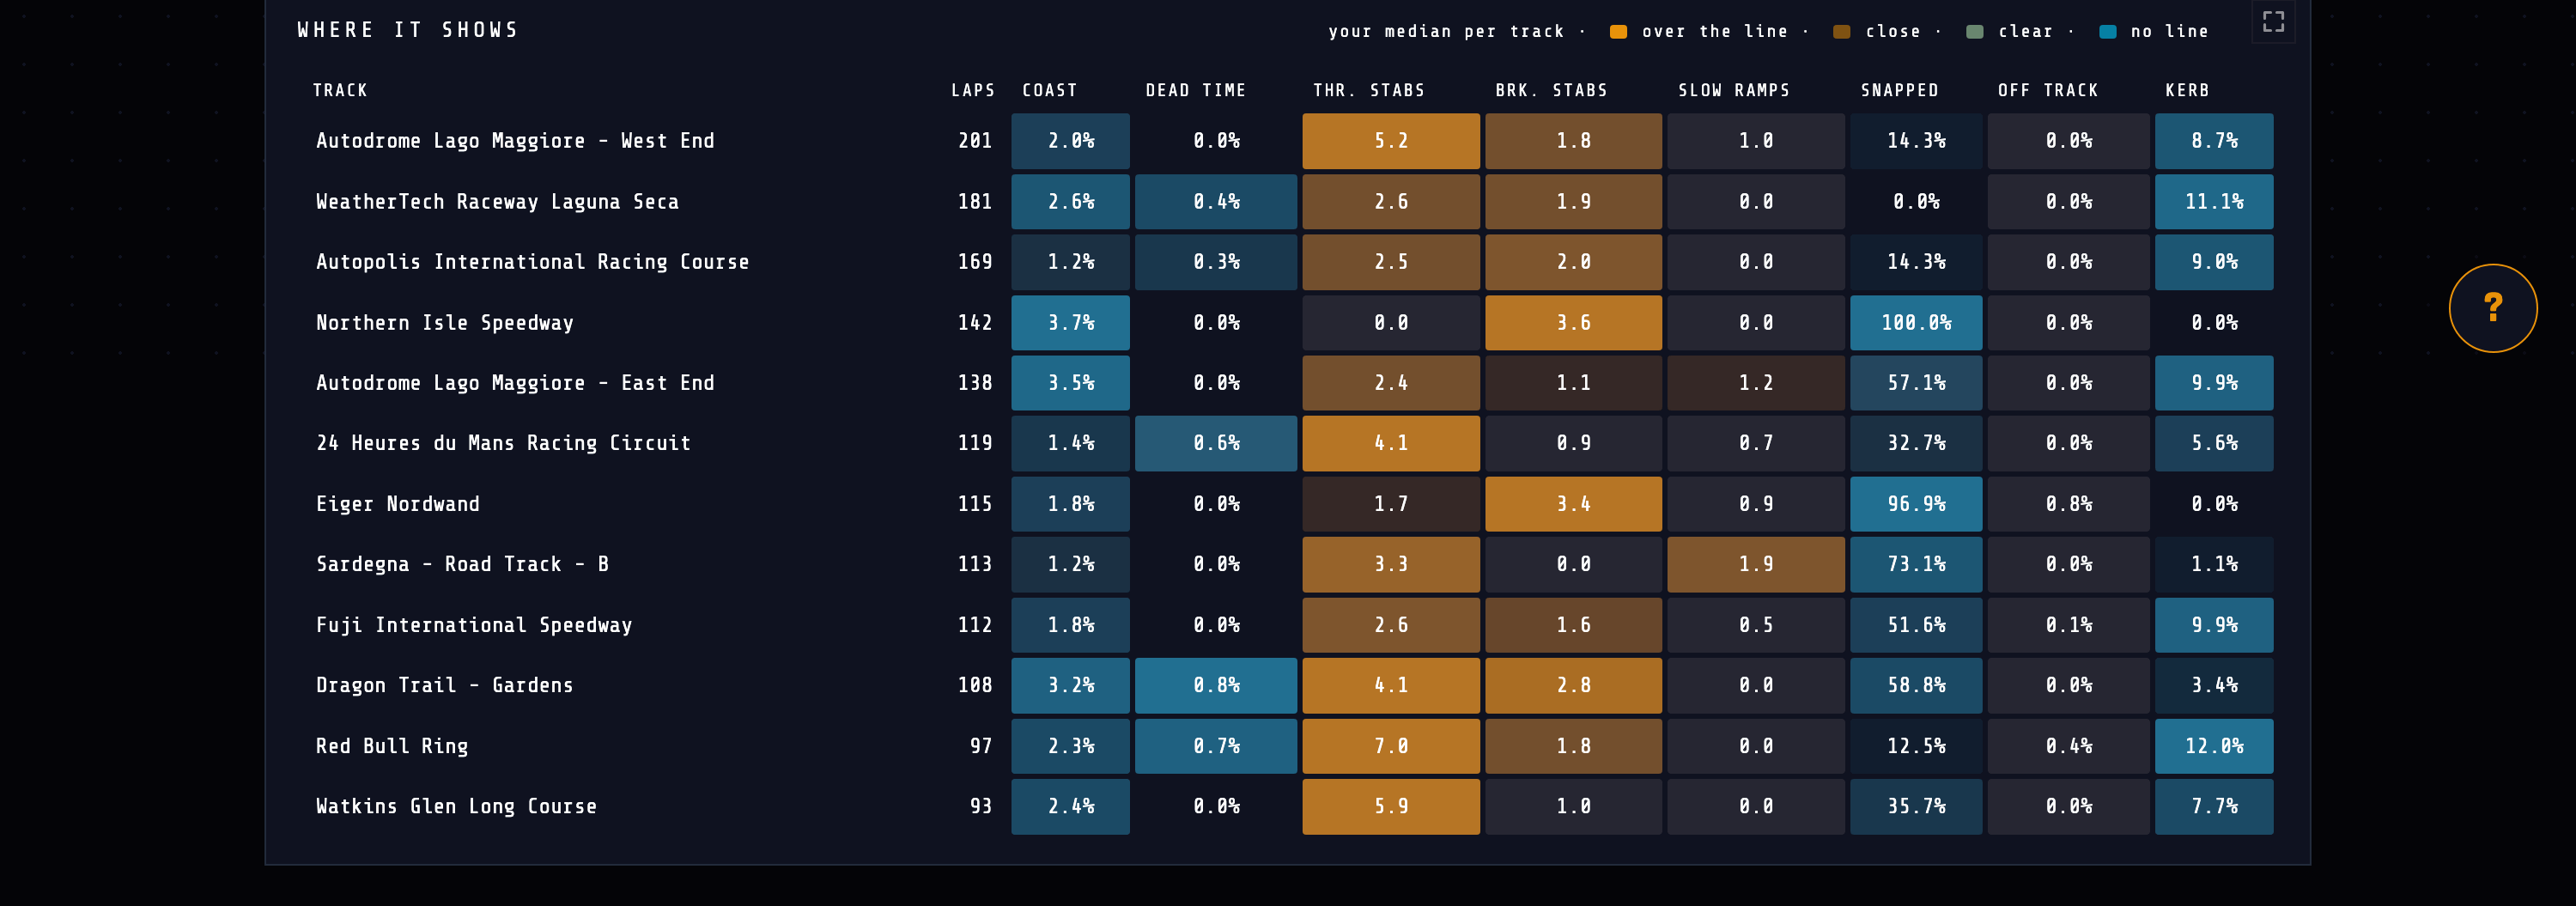
On this account the THR. STABS column tells the story at a glance: 7.0 a minute at Red Bull Ring and 5.9 at Watkins Glen against a 2.0 line, while Autopolis sits at 2.5 and Eiger at 1.7. The habit is real, but it is not everywhere — and that is a different practice plan than “stop stabbing the throttle.”
Focus on
This is the part everything else is built to support: the ranked list of what to work on, ordered by time at stake and then by how often it shows.
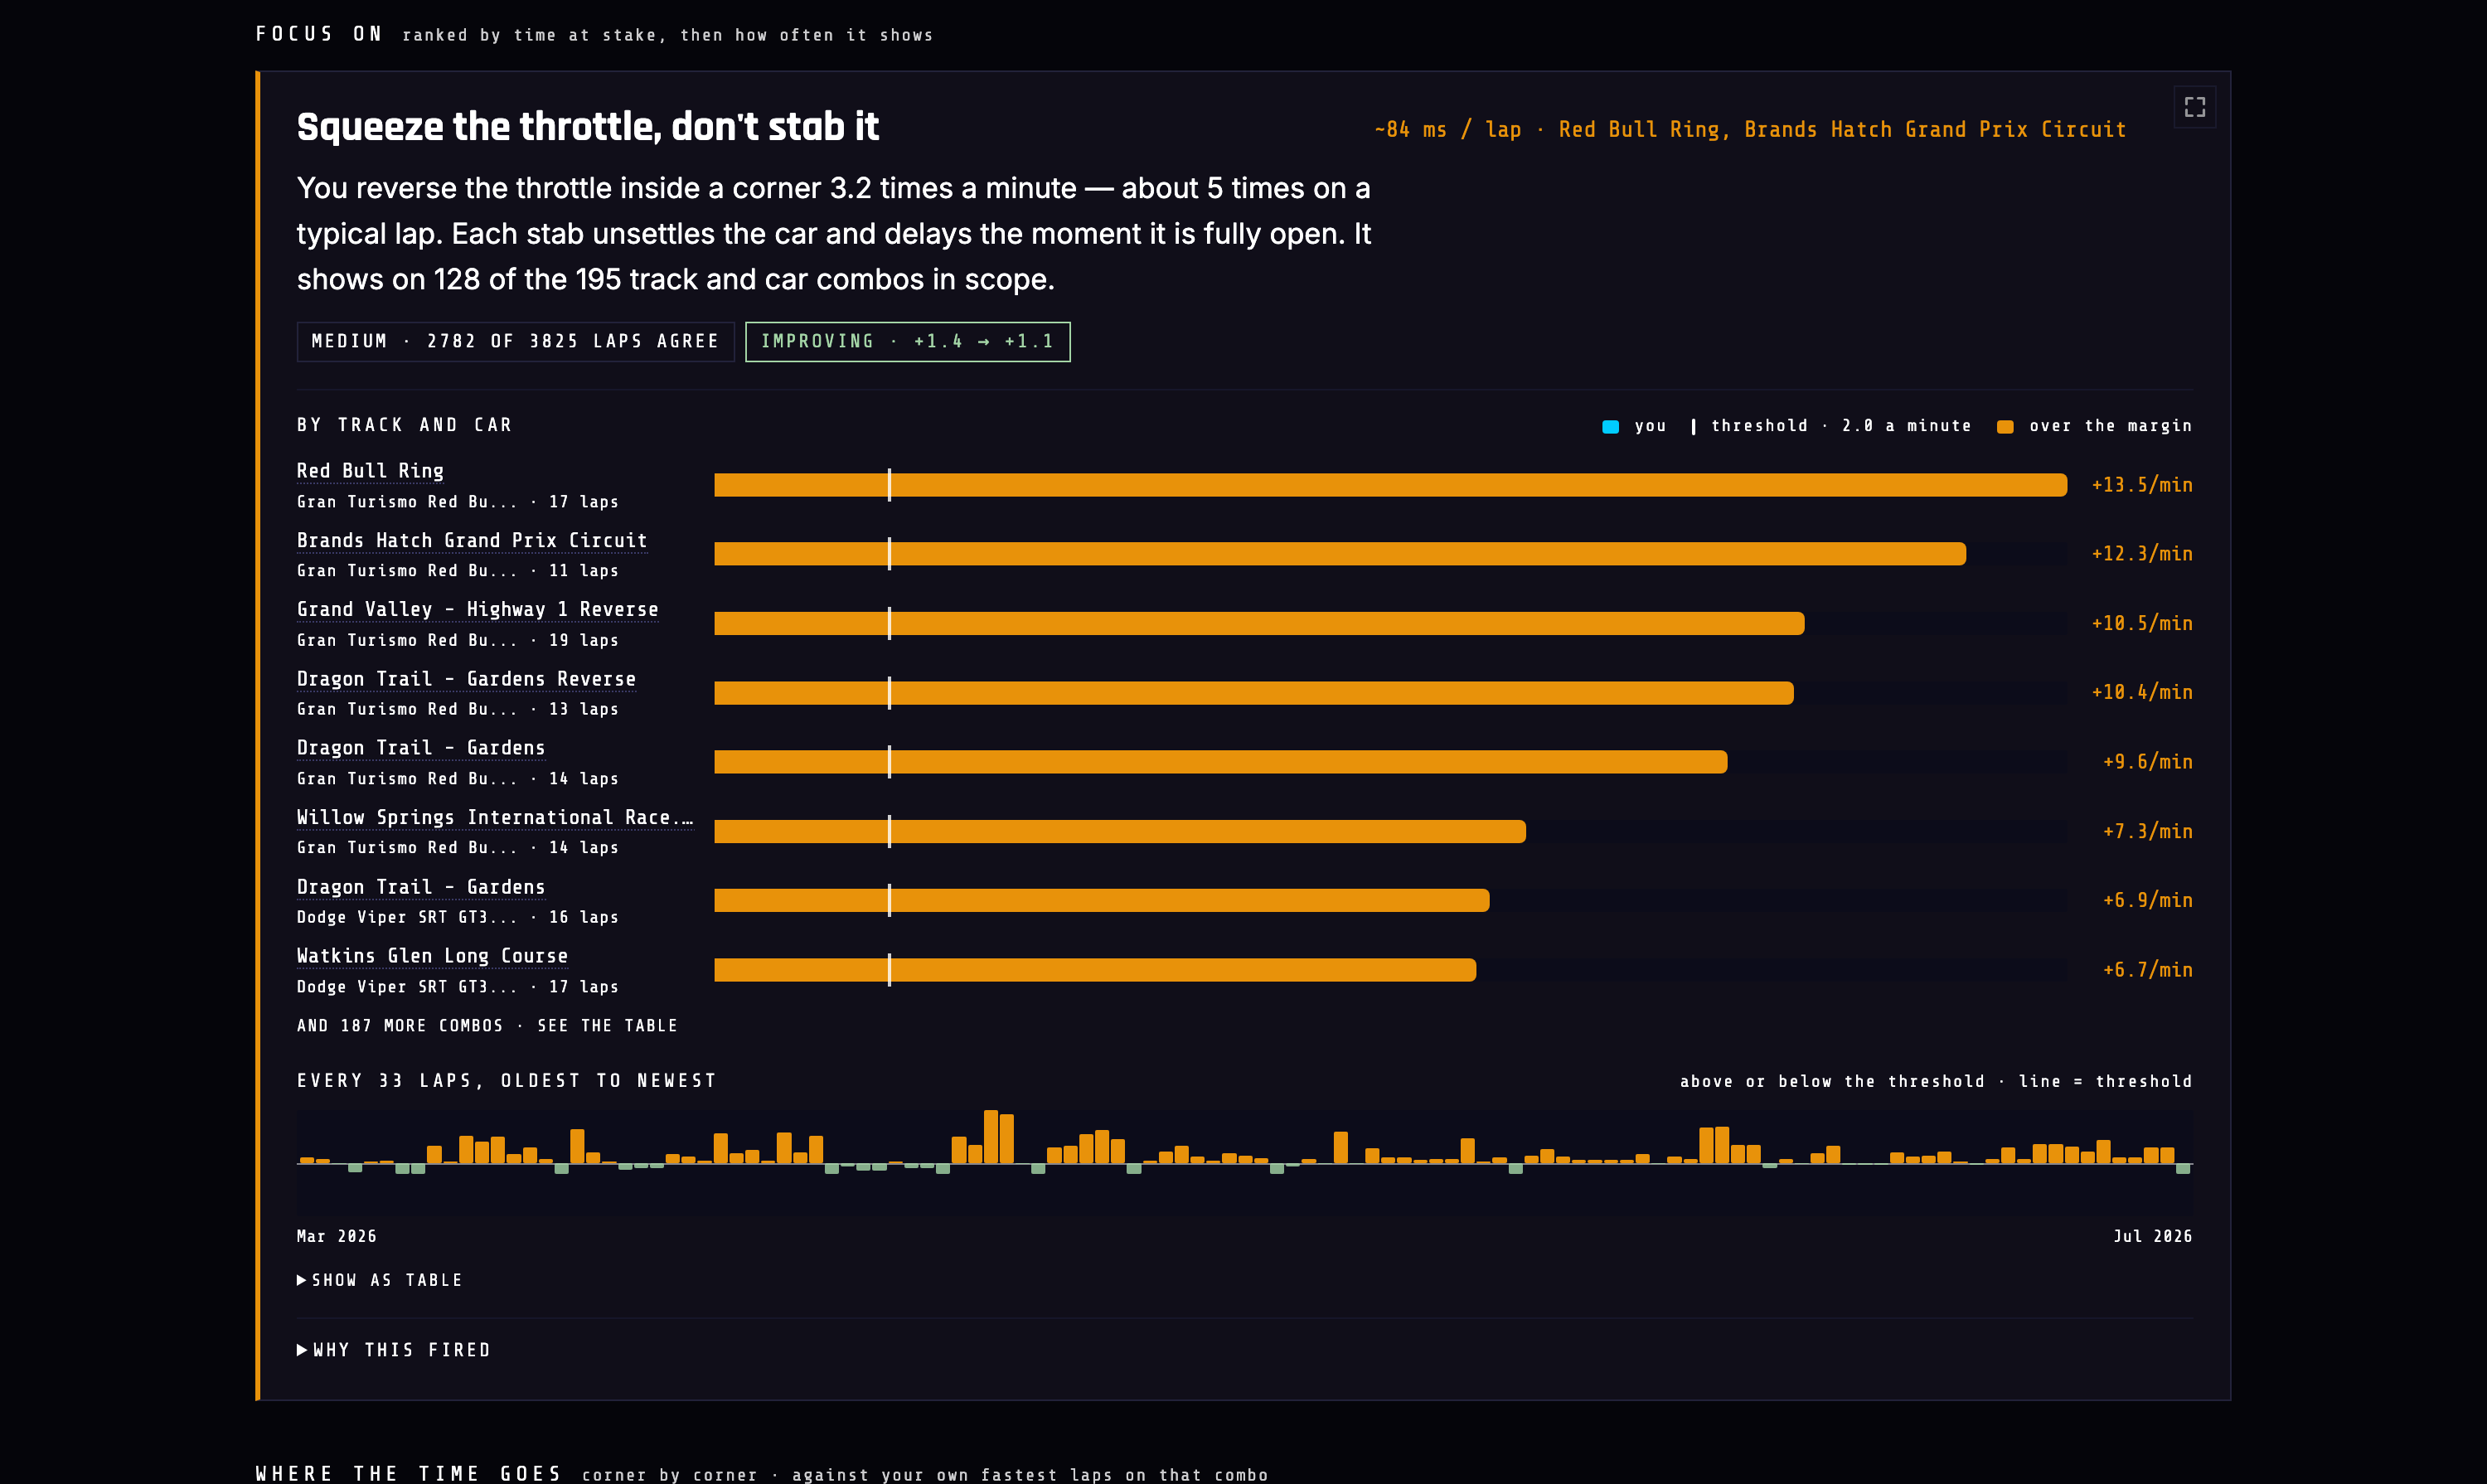
You reverse the throttle inside a corner 3.2 times a minute — about 5 times on a typical lap. Each stab unsettles the car and delays the moment it is fully open. It shows on 128 of the 195 track and car combos in scope.
MEDIUM · 2782 of 3825 laps agree IMPROVING · +1.4 → +1.1
Every part of that card is load-bearing:
- The headline is an instruction, not a metric name. “Squeeze the throttle, don't stab it” is something you can take into the next corner. “throttle_stabs: 3.2/min” is not.
- The price is in milliseconds per lap. ~84 ms is what this habit is worth on the combos where it can be measured. Findings are ranked by this, so the top card is the largest thing you can actually cash in.
- The body translates the number into a lap. 3.2 a minute means roughly five stabs on a typical lap, and it says what a stab does to the car.
- The confidence chip shows its working. MEDIUM · 2782 of 3825 laps agree — the exact lap count behind the claim. A finding is raised only when the pattern holds on at least 60% of your laps; it is called HIGH when it holds on 80% across three or more sessions.
- The trend says whether you are fixing it. IMPROVING · +1.4 → +1.1 compares the older half of the window to the newer half. This driver is already moving in the right direction.
- By track and car ranks every combo by how far over the line it sits — Red Bull Ring at +13.5/min on 17 laps, down to Watkins Glen at +6.7. That is your practice order.
- Every 33 laps, oldest to newest is the long history as one strip, so a recent improvement cannot hide a year of the opposite.
- Why this fired opens the rule: the threshold, the laps, and the test it passed.
The page itself needs 10 clean laps across at least 2 sessions, so one evening can never define you. Each finding then needs 10 laps of its own, a pattern that holds on 60% or more of them, and agreement from at least half the track-and-car combinations it can be measured on — never fewer than two, so a single circuit can never carry a finding. The threshold it is measured against is written in the code, not fitted to your data: throttle stabs are judged against 2.0 a minute for everyone.
What costs you time
The Focus cards say a habit is wrong. This section says what it is worth, in your seconds, on your combos.
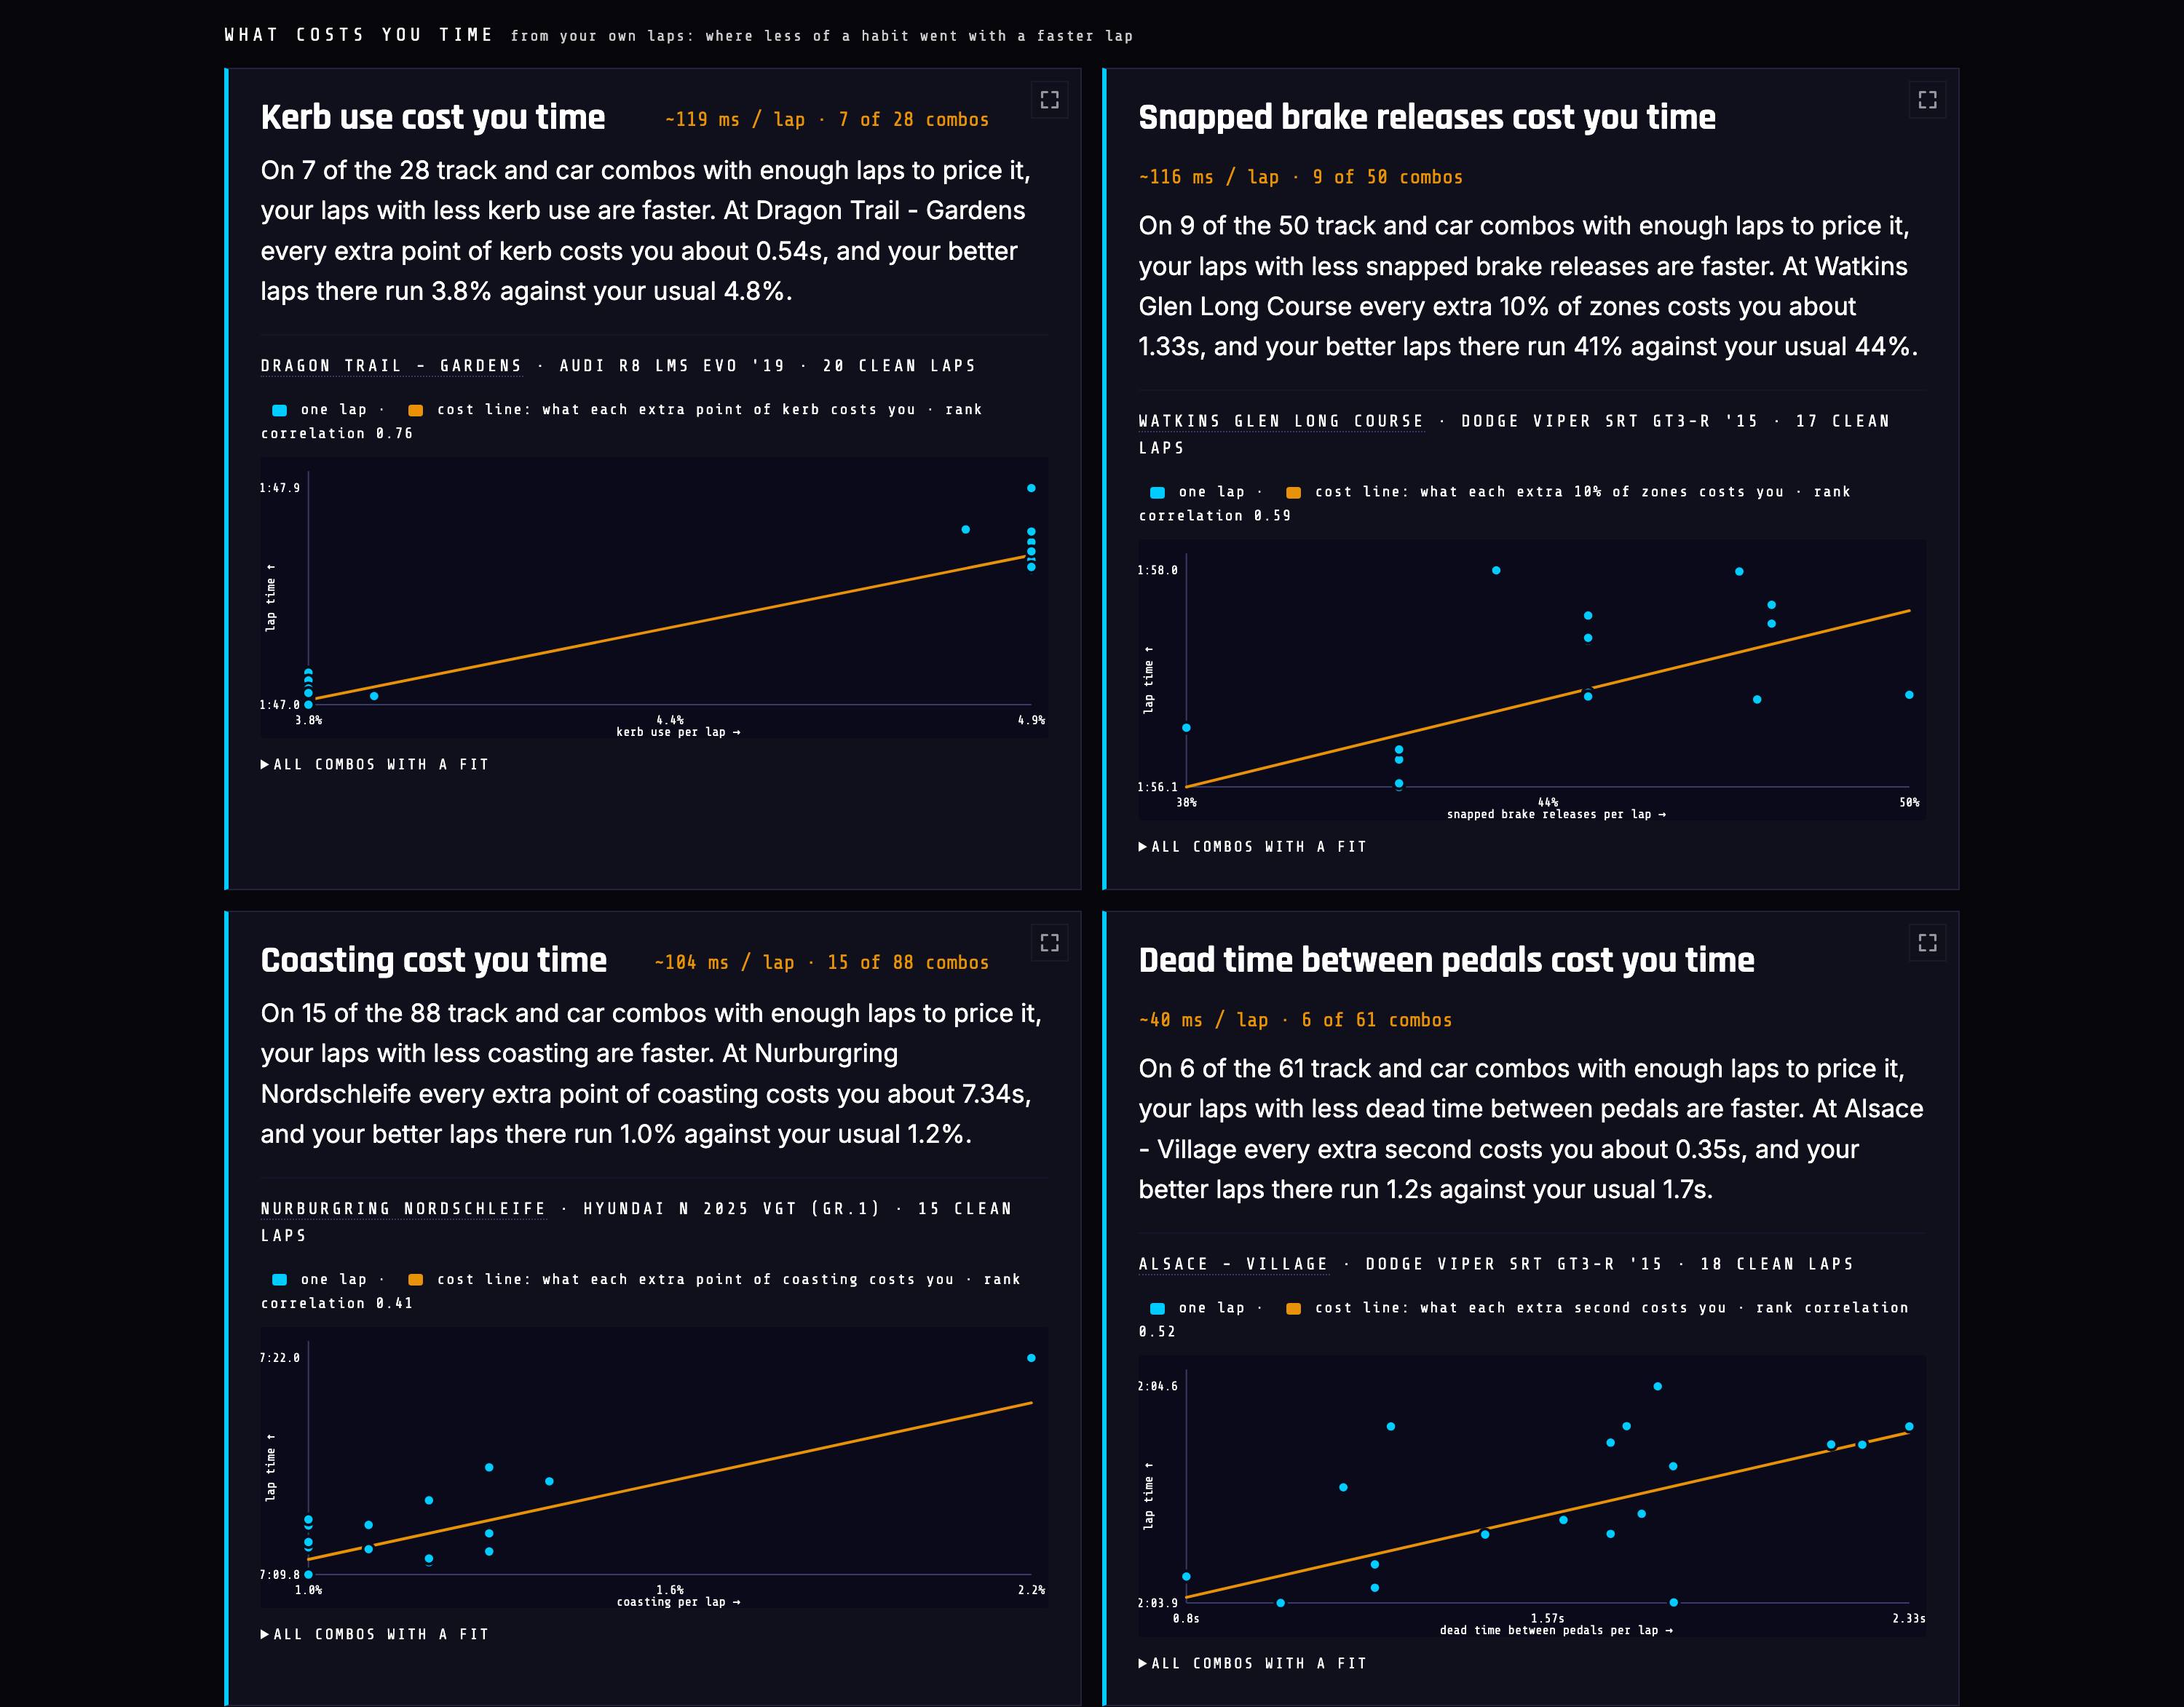
The method is simple enough to trust. Take one track-and-car combination. Take your clean laps on it — laps within 10% of your best, so a scruffy lap cannot set the slope. Line up the habit against the lap time and fit a line. If laps with less of the habit are consistently faster, the slope is what that habit costs you there.
| Habit | Price | Combos | Clearest example |
|---|---|---|---|
| Kerb use | ~119 ms / lap | 7 of 28 | Dragon Trail – Gardens, Audi R8 LMS Evo '19: every extra point of kerb costs ~0.54s. Better laps run 3.8% against a usual 4.8%. |
| Snapped brake releases | ~116 ms / lap | 9 of 50 | Watkins Glen Long Course, Dodge Viper SRT GT3-R '15: every extra 10% of zones costs ~1.33s. Better laps run 41% against a usual 44%. |
| Coasting | ~104 ms / lap | 15 of 88 | Nürburgring Nordschleife, Hyundai N 2025 VGT (Gr.1): every extra point of coasting costs ~7.34s. Better laps run 1.0% against a usual 1.2%. |
| Dead time between pedals | ~40 ms / lap | 6 of 61 | Alsace – Village, Dodge Viper SRT GT3-R '15: every extra second costs ~0.35s. Better laps run 1.2s against a usual 1.7s. |
Two things to notice. First, the ranking is not the same as the fingerprint's. Kerb use is never judged as a habit — but on this account's laps, less of it goes with a faster lap, and it prices higher than anything else. That only shows up because the fit is run against your times rather than a rule.
Second, the combo count is on the card: 7 of 28 combos. A fit needs at least 15 laps on a combo, a rank correlation of at least 0.35, and agreement from at least two combos before it is shown at all. Seven out of twenty-eight is the honest shape of the claim — this costs you time in some places, and the card names them.
These are correlations on your own laps, and the card shows you the scatter and the rank correlation so you can judge the strength yourself — 0.76 at Dragon Trail is a much tighter relationship than 0.41 at the Nordschleife. Treat the number as what the habit is worth chasing, and the corner tables below as where to chase it.
Through the corners
Everything above is a whole-lap number. This is where it becomes a place on the map.
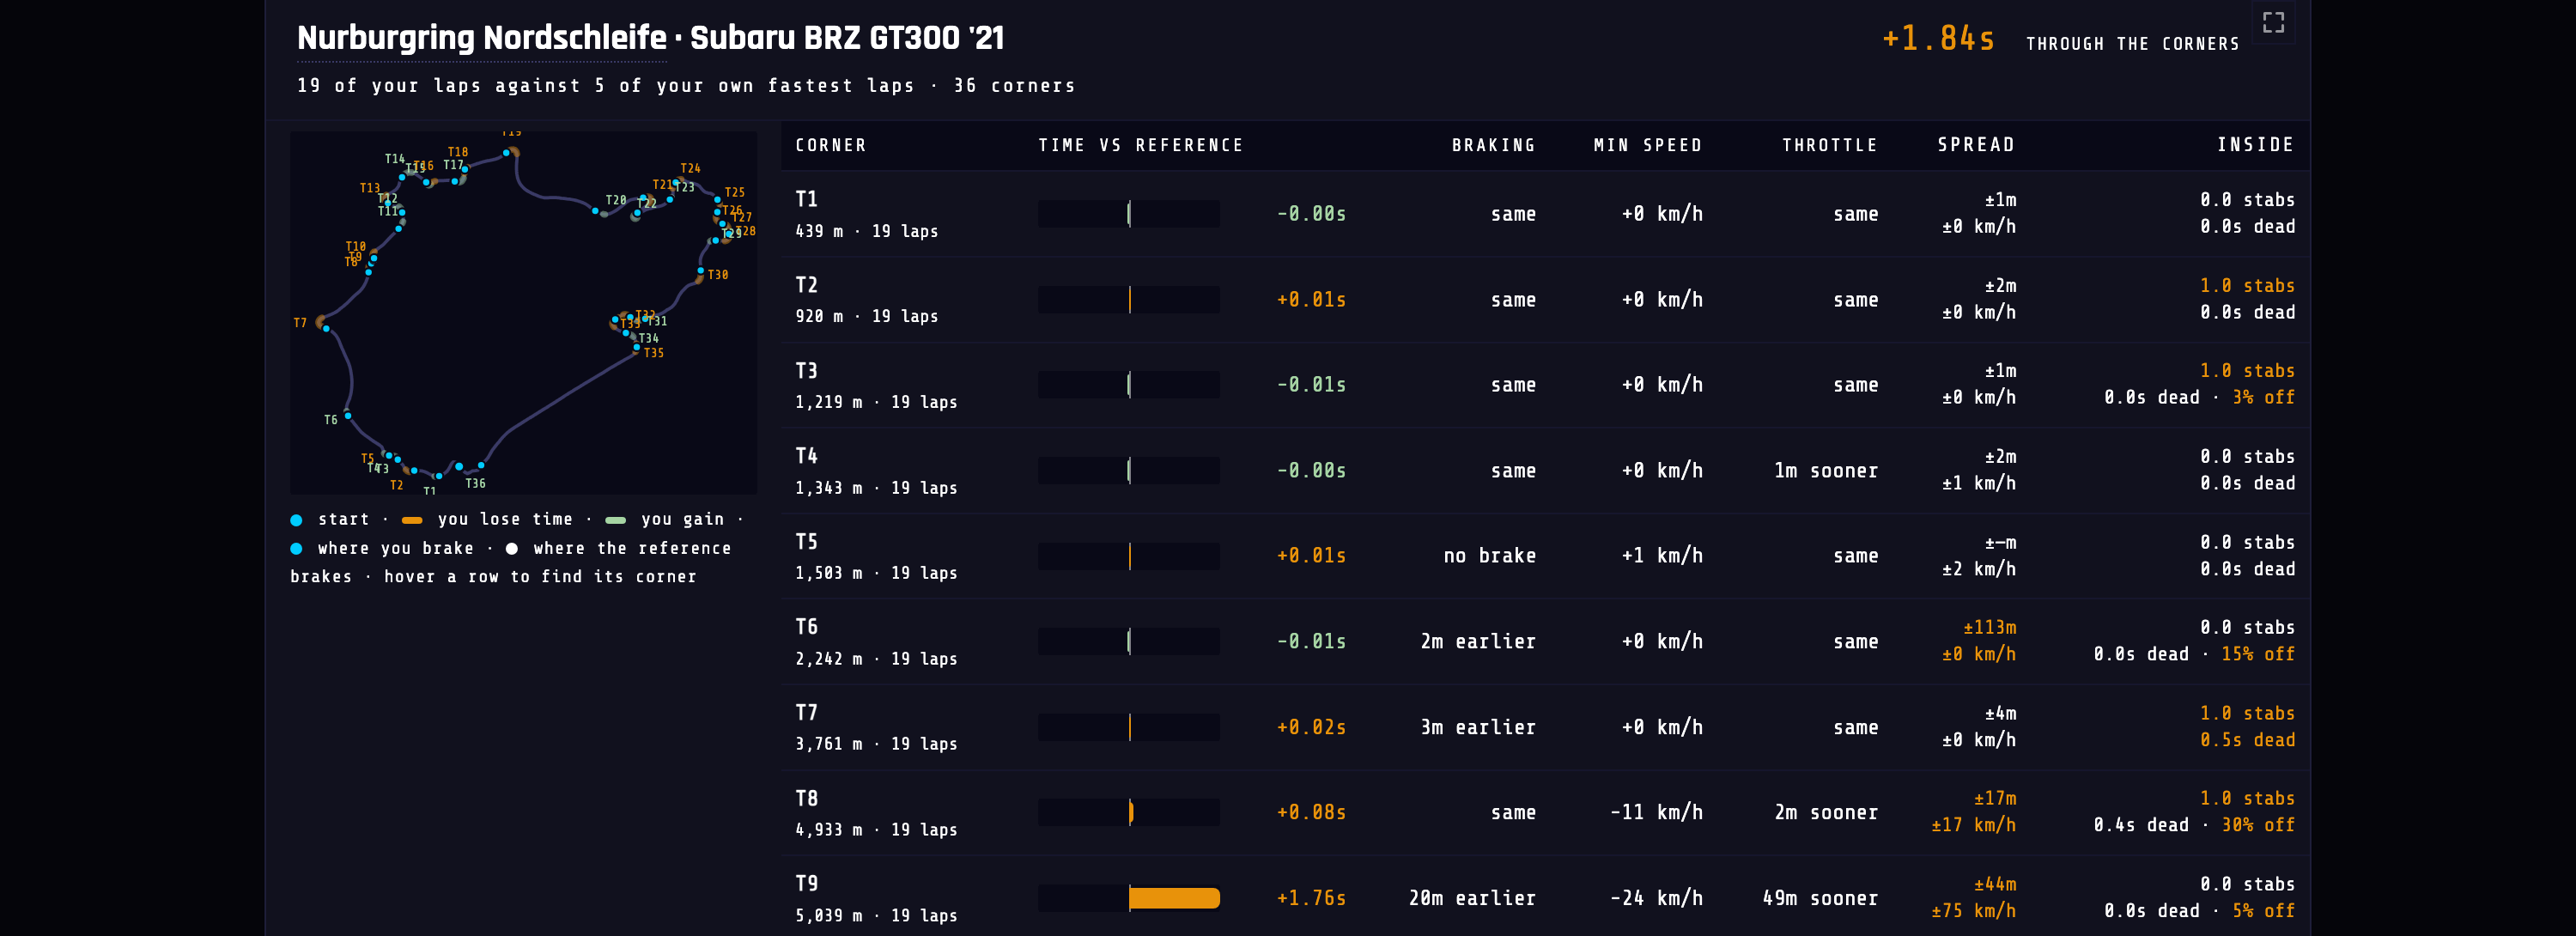
Read the header first: +1.84s through the corners. Then read down the time column until something stops you. On this combo, one row does:
Braking 20m earlier · Min speed −24 km/h · Throttle 49m sooner
Spread ±44m, ±75 km/h · 0.0 stabs · 0.0s dead · 5% off
Thirty-six corners, 1.84 seconds, and 1.76 of them are at turn nine. The row also says exactly what is happening: braking starts twenty metres too early, the car is twenty-four km/h too slow at the apex, and because it is so slow the throttle comes back forty-nine metres sooner than it should. The spread column says the corner is not even repeatable — the middle half of the laps vary by 44 metres on the braking point and 75 km/h at the apex.
That is one instruction: brake later at T9 and carry the speed. Nothing else on this combo is worth touching until it is fixed.
| Column | What it is |
|---|---|
| Time vs reference | Your median through the corner against the reference. Amber = you lose time, green = you gain. |
| Braking | Metres before the apex where braking begins, as a delta. |
| Min speed | Apex speed, as a delta. |
| Throttle | Metres from the apex where the throttle comes back, as a delta. |
| Spread | How much your own laps vary here — the middle half, braking point and apex speed. |
| Inside | Your median per lap at this corner: throttle stabs, dead time, and off-track share. |
Two details worth knowing. Deltas printed in amber hold on 60% or more of your laps at that corner, so a colour tells you whether it is a habit or a one-off. And the corner clock runs from 100m before the entry to 100m past the exit, which is why the corner totals do not add up to the lap — the straights are not in them.
Corners are numbered from the start line by the track's geometry. A corner shows its official name once it has been verified in the turn editor.
Keep doing
The last section is the one people skip, and it is the reason the rest of the page is safe to act on.

You are consistent lap to lap. Your laps sit within 0.2% of each other in a session. Pace built on that sticks.
That matters because the fastest way to break a driver is to hand them five things to fix. Racecraft ranks, prices, and then tells you what not to touch.
Compare — the same read, against other drivers
Switching to COMPARE changes the reference. Instead of your own fastest laps, every habit is judged against the fastest quarter of other drivers' laps on the same track and car, plus any benchmark laps on that combo. Nothing looser — a different car on the same track is not a comparison.
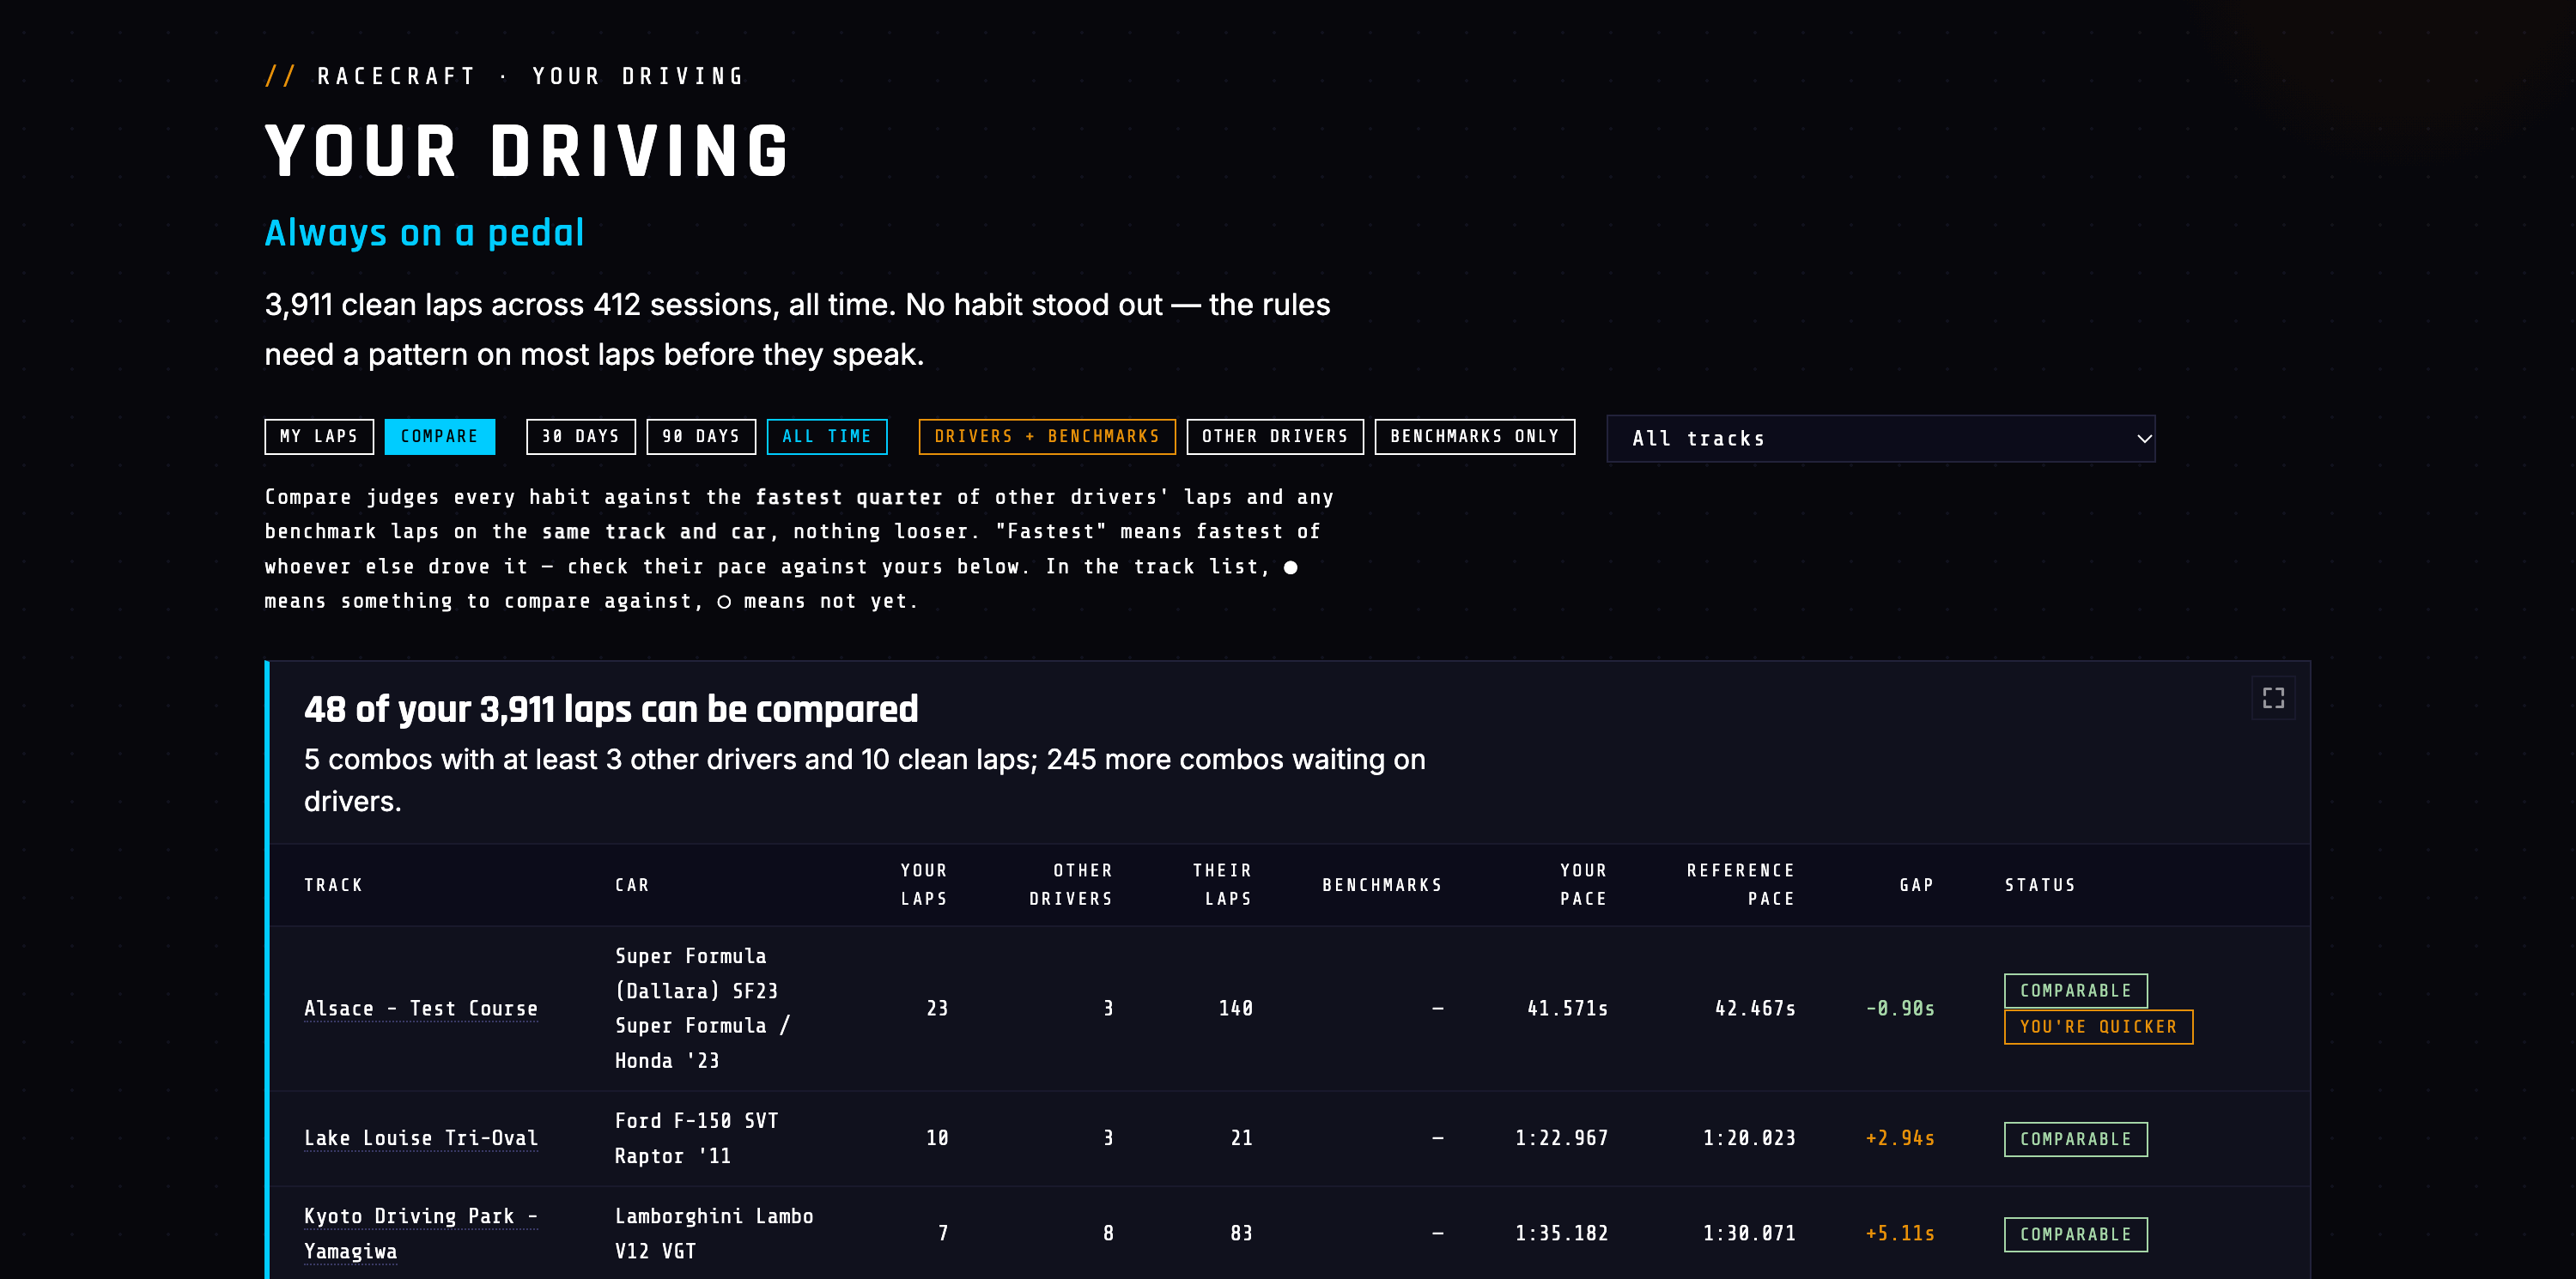
Note the signature changed too — the same account reads Always on a pedal in Compare, because against this reference no whole-lap habit clears the bar. The page says so in plain words rather than reaching for one:

That is the most useful thing this page can say to a driver who is already tidy. The pedals are fine. The gap is geometry, and it is in the corner tables.
Compare also carries a DRIVERS + BENCHMARKS / OTHER DRIVERS / BENCHMARKS ONLY switch, so you can measure yourself against the field, against the benchmark laps, or both. A combo needs at least 3 other drivers and 10 clean laps from them before it is used, and the coverage table names every combo that is still short and what it is waiting for.
How to actually use it
- Open Your Driving on ALL TIME. Read the signature and the top Focus card. That is your one thing.
- Open the matching lesson. The Focus headline maps onto a Racecraft lesson — throttle stabs to Throttle Control, snapped releases to Trail Braking, dead time to Pedal Transitions. Read what good looks like on a trace.
- Pick the track from “by track and car”. Practise where the habit is worst, not where you happen to feel like driving.
- Open Through the corners for that combo and find the row costing the most. Take one instruction into the session.
- Drive, then come back on 30 DAYS. The week-by-week panel and the trend chip tell you whether it moved.
What you get on each plan
| Free | Pro | |
|---|---|---|
| All 11 Racecraft lessons, chart demos and quizzes | ✓ | ✓ |
| P1 benchmark example beside your own lap | ✓ | ✓ |
| Your Driving — signature, coverage, top finding's headline | ✓ | ✓ |
| The evidence behind the headline | — | ✓ |
| Habit fingerprint, week by week, where it shows | — | ✓ |
| Every finding, not just the first | — | ✓ |
| What costs you time — the priced fits | — | ✓ |
| Through the corners | — | ✓ |
| Compare against other drivers and benchmarks | — | ✓ |
The lessons are how driving fast works. Your Driving is how you drive. The first is free because it should be. The second is the product.